

How To Increase Fps In Rust
Despite being released 7 Years Ago, Rust still has loads of optimization and performance problems that need to be addressed. No matter what the problem, the game still makes it to the best-sellers of Steam and consecutively dominates the Top 5 Concurrent Players Record. We are perfectly aware of how good the game is; however, that's not the subject of today. Instead, we'll focus on in-depth analysis on how to increase FPS In Rust, what are the Best Rust Settings, and getting the most out of your System. The methods shared in this performance guide are perfectly safe, and guaranteed to show results.
Our guide like always would be divided into three segments. The first one will focus on Windows Optimizations, while the second would be related to the application settings. And third is going to highlight the Best Nvidia/AMD Graphics Settings For Rust. Besides, If you are trying to learn how to Craft Auto Turret in Rust, go through that as well.
It's reasonable to presume that considering its a 2013 game, your PC already has modern hardware that could play the game. However, just to let you know, Rust has gotten significant graphical improvement over the years, which ultimately fueled to newer system requirements. These are attached below, and make sure to comply with your system requirements with them.
RECOMMENDED:
-
- Requires a 64-bit processor and operating system
- OS: Windows 10 64bit
- Processor: Intel Core i7-4790K / AMD Ryzen 5 1600
- Memory: 16 GB RAM
- Graphics: GTX 980 / AMD R9 Fury
- DirectX: Version 12
- Network: Broadband Internet connection
- Storage: 20 GB available space
- Additional Notes: SSD is highly recommended.
Windows 10 Optimizations

As suggested above, before jumping to the main Best Rust Settings, the first segment would contain all the necessary Windows 10 Optimizations, which will guarantee significant performance improvements. These methods aren't done through third-party, and you wouldn't need any additional softwares. Instead, we will configure the default settings that are aimed towards balance power plans and not for gaming. Once changed, you are bound to see a dramatic increase in not just Rust, but across all games.
Don't forget to create a System Restore Point, so you could roll-back, incase of any misunderstanding.
Maximize Your CPU While Playing Rust
The title might sound a bit confusing, but it's true that your CPU is not always being utilized 100% while playing Rust. Often, Windows 10 sets a balanced Power Plan that limits the power through various thresholds, resulting in very limited amount of FPS. This can be specifically changed through Ultimate Performance, which involves a code, that uncloks all the barriers while you play Overwatch. This method has time and time again proven to be effective. Laptop users are generally the ones who benefit the most.
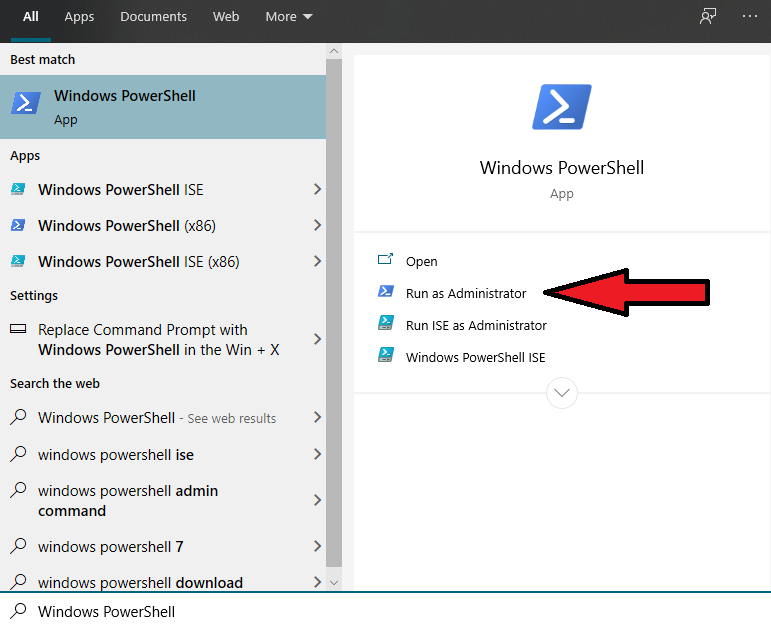
- Search and Open "Windows PowerShell" With Administrator Privileges
Windows PowerShell - Paste this code shown below, and you will see a message indicating that Ultimate Performance was successfully initiated. Suppose, it didn't, and you had to face some sort of error. Replicate the same steps inside Command Prompt.
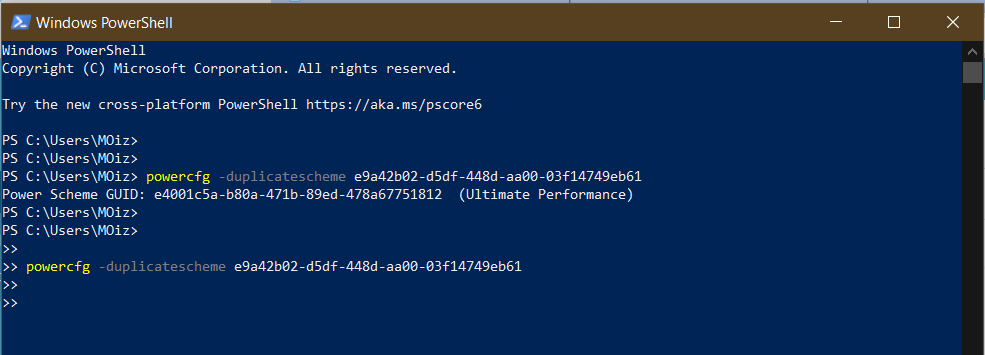
Command Prompt - powercfg -duplicatescheme e9a42b02 -d5df -448d -aa00 -03f14749eb6
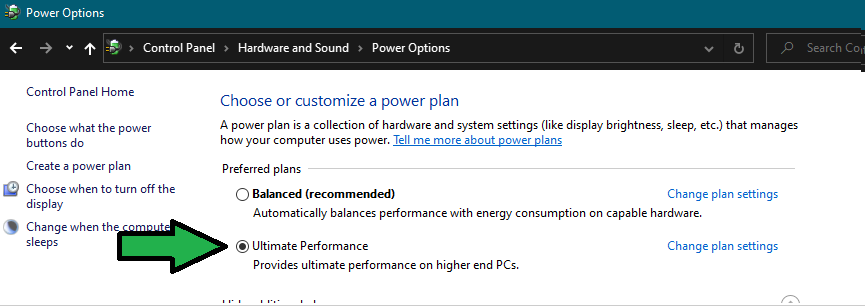
- After you are done adding the code, head over to Edit Power Plan and Power Options.
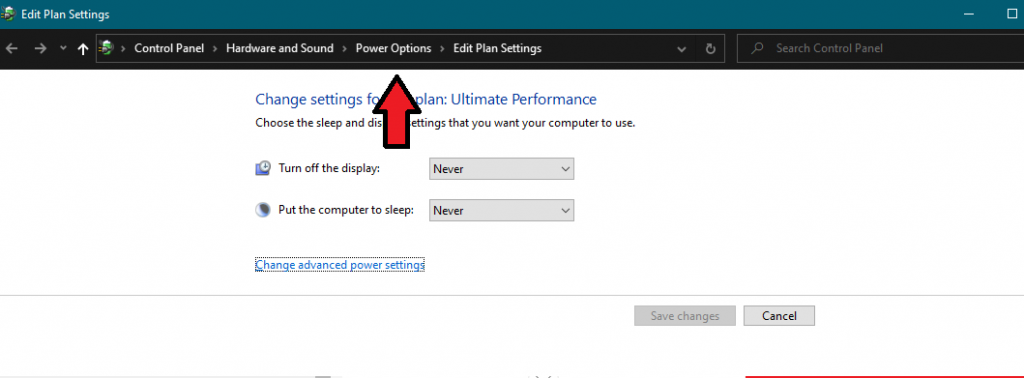
- Checkmark Ultimate Performance and you are done.
 From now on, always expect your CPU to push the limits and give you all it has while playing Rust.
Disable Unnecessary Animations
While using Windows 10, you might have noticed the fancy animations while clicking on anything. These illustrious animations might look good, but they come with the price of performance, which we aren't going to compromise on. Luckily Windows 10 allows you to disable these fancy animations and speed up the entire process. Likewise, you will also save lots of performance and reduce significant burden on CPU/Memory, which can then be utilized by the game instead.
- Open View Advanced System Settings > Performance > Settings > Enable Custom and Only Checkmark the options shown below.
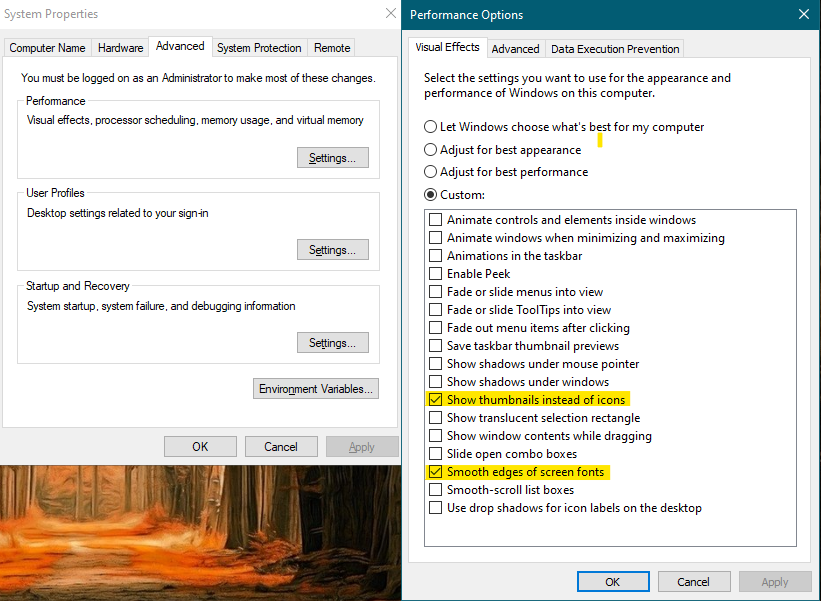
Animations - After the changes are made, click on apply and ok to save the settings.
Get Rid Of Hardware Acceleration
The term hardware acceleration might sound good, indicating higher performance boosts and so forth. However, that's not the case in reality. Hardware Acceleration runs your program through a new meta, that it describes as efficient, because of the way how resources are unpacked. This isn't generally beneficial for common apps like Discord, Google Chrome, and Steam; because the core purpose of these apps remain the same.
Consequently, on the other hand, Hardware Acceleration uses many resources to run the apps through the new meta. This ultimately results in low FPS, while you play Rust, and the CPU is always being utilized without your information. Thankfully, these resources can be saved through a couple of steps, and you will see a tremendous FPS boost across all games.
We will only highlight the general way on how to disable this across the three common applications. We expect you to disable them across any third-party application that has this option.
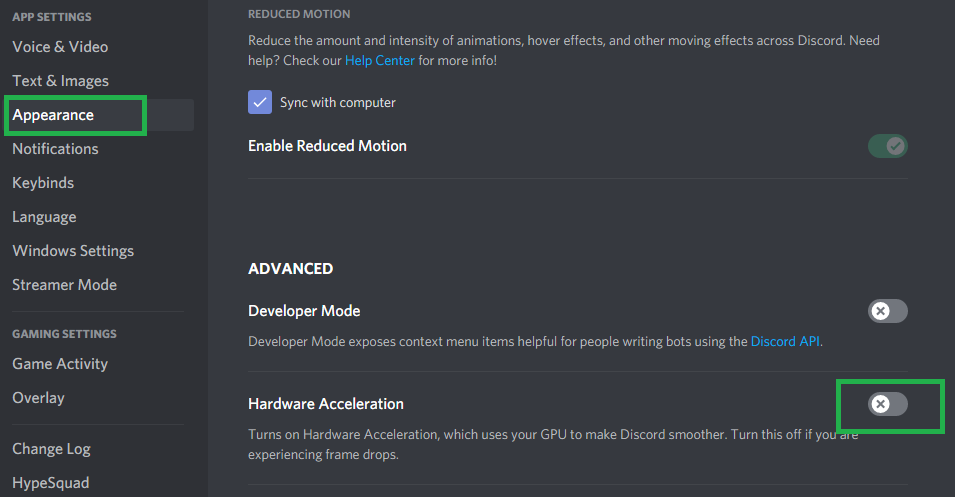
- Under Discord Settings > Appearance > Disable Hardware Acceleration.
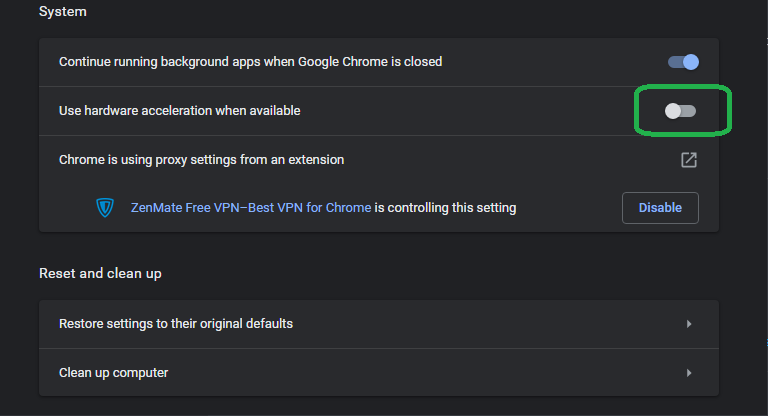
Disable Hardware Acceleration. - Proceed To Google Chrome Settings > Advanced > System > Uncheck "Use Hardware Acceleration When Available"
Google Chrome Settings - Go to Steam Settings > Interface > Disable the following four options
"Enable smooth scrolling in web views (requires restart)
"Enable GPU accelerated rendering in web views"
"Enable Hardware Video Decoding"
"Enable DirectWrite For Improved Font Smoothing and Kerning"

Make Sure No Extra Applications Are Running In The Background
While Playing Rust, you should be perfectly aware that no extra application beside the Anti-Cheat is running in the background. You wouldn't normally give this a lot of attention, but If I were to tell you that while playing Rust, you should check your Task Manager. You would find out the insane amounts of unnecessary applications and services that are nearly squeezing 40% of your CPU and Memory Usage.
Likewise, you can wonder how much performance would improve, If you disable these unnecessary applications and services. Follow the steps below and see results for yourself!
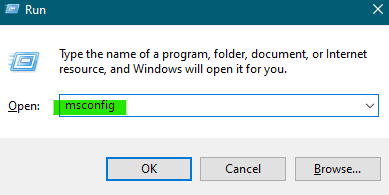
- Open Run > type and enter MSConfig
MSConfig - Head over to the services tab and checkmark "Hide All Microsoft Services" – This would hide the important services that are compulsory for your Windows 10 to operate.
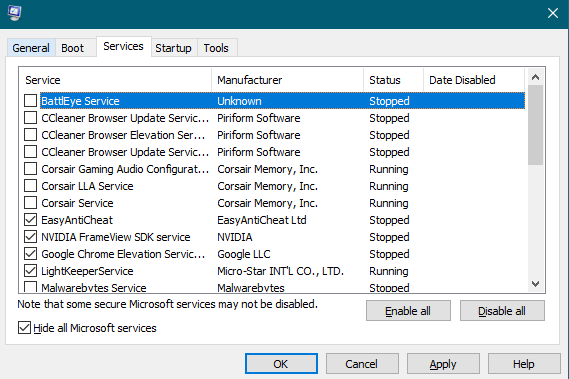
Hide All Microsoft Services - Now from the new list, disable all the unnecessary third-party services, that could burden your PC while playing Rust.

third-party services - After making the suitable changes, click on Apply and head over to the Startup Tab. There will be a new list with similar applications, and your job is to disable the one's with high priority.
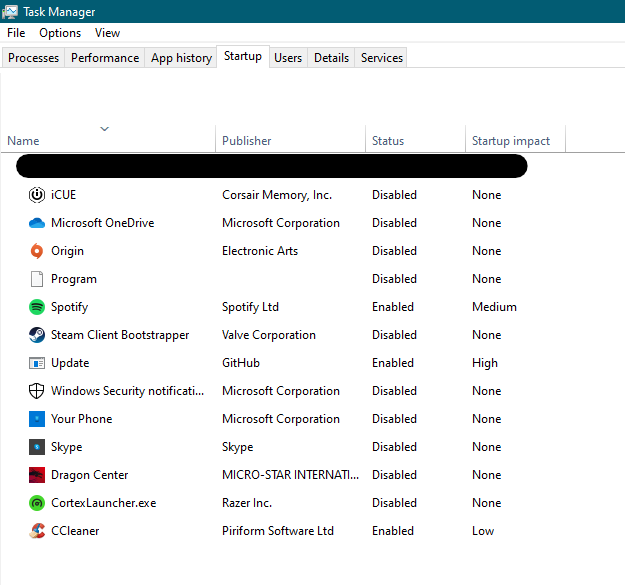
Startup Tab
Making the changes suggested above will not only increase your FPS in Rust, but it'll also significantly change the boot times.
Perform a Disk Cleanup
A Hard Drive excessively filled with useless files, potentially crash reports, leftovers, and more can temporarily slow down its speed, ultimately resulting in lower FPS while playing Rust. Having said that, this is isn't a huge problem, and as you might have accomplished the 50% of this step by cleaning the temp files. You should now also perform a Disk Cleanup, that will ensure rapid responsiveness and blazing speeds. This will further benefit you while playing Rust, and then again, things like these often are the fix for stuttering, crashes, and all sorts of FPS Drop related problems. Keep in mind, alongside our Best Rust Settings, and these tweaks, you will see massive improvement.
- Right Click on the Drive where Rust Is Installed And Go To Properties
- Checkmark all the unnecessary files and avoid the important ones because they will be completely deleted.
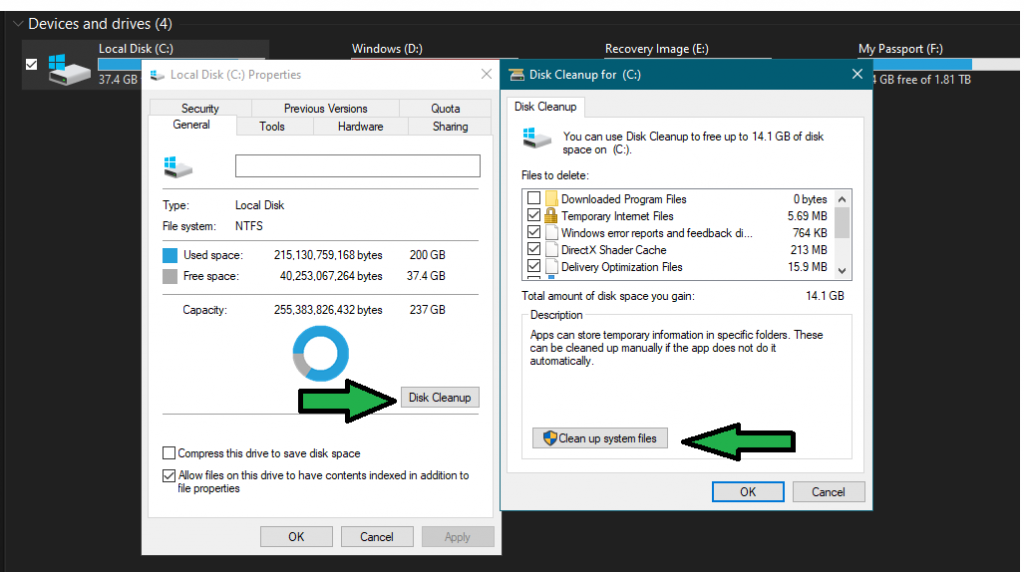
Disk Cleanup - With that done, finally, click on "Clean Up System Files."
Maximize GPU Usage While Playing Rust
Similar to many other Windows 10 features we introduced above. There is also another feature called Graphics Profile, which essentially allows you to change the priority of your Graphics Card for a specific game. This results in tremondous FPS Boost, and furthermore ensures that the Hardware is running at its max potential. The process is entirely safe, and this can also work with other games. Just keep in mind that If you add an unncesary program to the graphics profile, your PC could crash. Besides, this feature is only available in Windows 10.
- Here is how you can add Rust to the Graphics Profile.
- Open Graphics Settings through Search
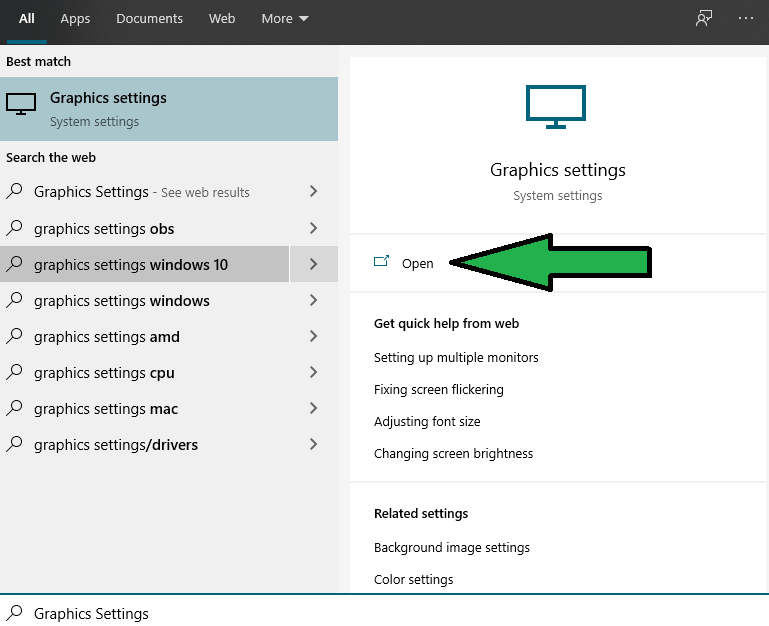
Graphics Settings - Add Rust to the profiles > checkmark High Performance and click on save
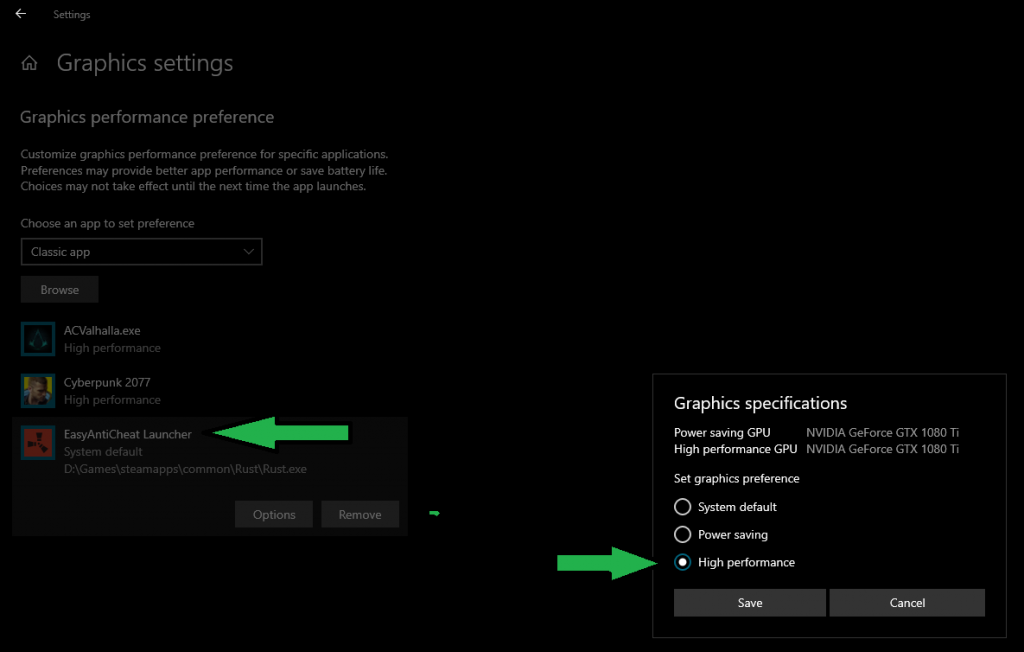
Graphics Settings
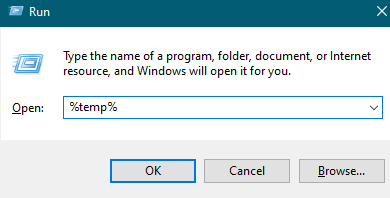
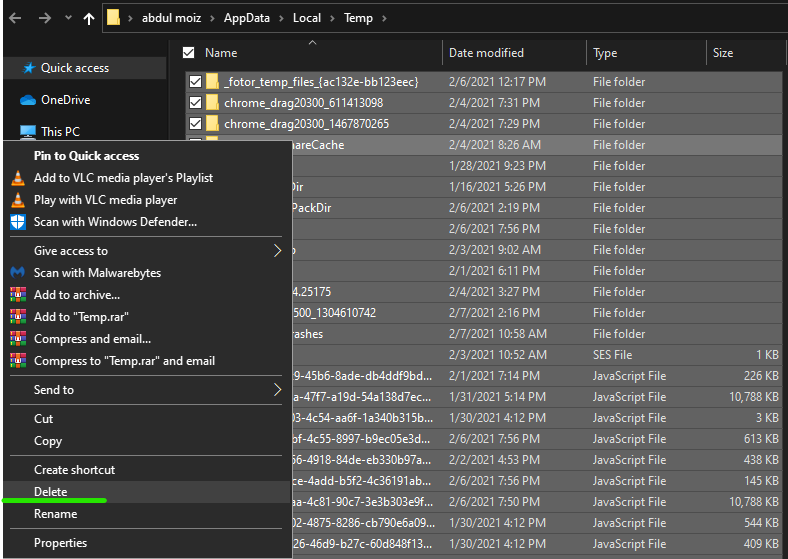
Delete Temp Files
Usually, one would think that after uninstalling various harmful programs, the virus would be gone. Sadly, this isn't the case, and Windows always seems to have a soft spot for uninstalled programs. These programs that are deleted or uninstalled have some files that go to the temp folder. A lot of them have leftovers that are mostly virus-infected and can cause serious trouble to your drive. This ultimately results in SSD/HDD being slower, and you see that impact in Rust.
- In order to get rid of these, you have to open Run
- Now enter %Temp%
Temp Files - Delete all the files by ALT + A > Right Click and Delete.
Temp Files
Disable Full-Screen Optimization
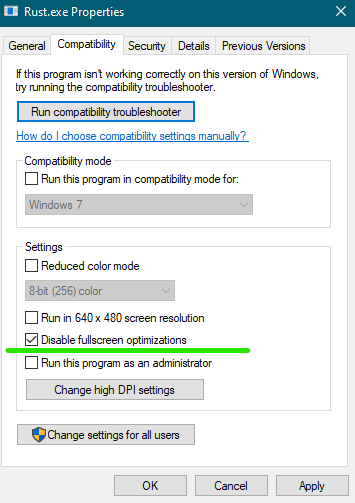
Full-Screen Optimization Full-Screen Optimization is another important setting that should always be disabled. There are lots of reasons as to why this should be disabled, however, the most important one is to avoid the borderless hybrid mode. By default, Windows 10 forces the applications to run in an irregular mode, which does not allow the hardware to run the game properly. This often results in stuttering, crashes, and more problems, which are further regulated through the slow ALT Tabbing. You can fix this by locating Rust.exe file and disabling full-screen optimization.
Disable Xbox Game Bar
How many times have you tried to figure out why the FPS in Rust are struggling to reach their average level? I have too, and as per my experience after playing the game for nearly 2000 hours. I can assure you that sometimes, it's Xbox Game Bar with the annoying notifications at the bottom right of the window, asking you to begin a record, and so forth. Usually, these aren't taken seriously by gamers, and suppose you dig deep. You would find out there are several Keybinds that can automatically trigger live streams and screen-recordings.
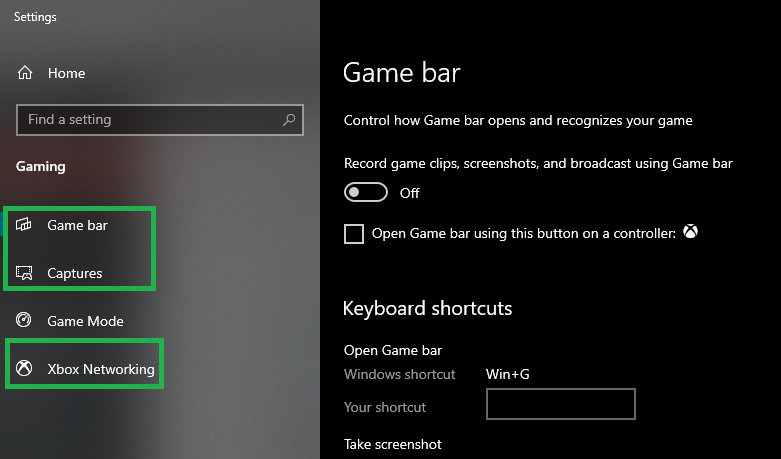
Xbox Game Bar To Disable, Xbox Game Bar > Head over to the settings tab > Disable everything in these three sections.
Enable Game Mode
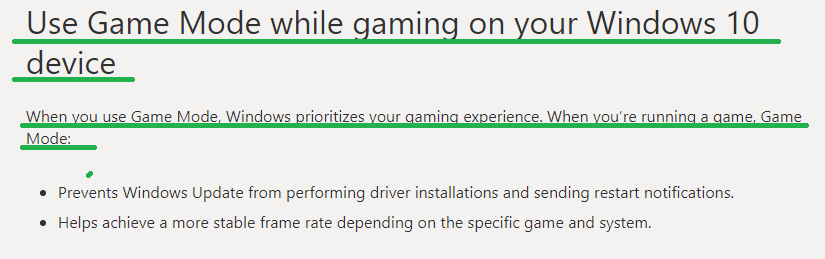
Game Mode Besides Xbox Game Bar, Microsoft does well in the Game Mode Department, which has consistently proven to be a top-tier setting. Subsequently, If you don't know much about it; Game Mode is a built-in feature within Windows 10, which is oriented towards gamers, providing with improved FPS across all games. This can also be beneficial in games like Rust, and describing Game Mode for itself would require a article on its own, but rest assured, this isn't something you would want to miss on.
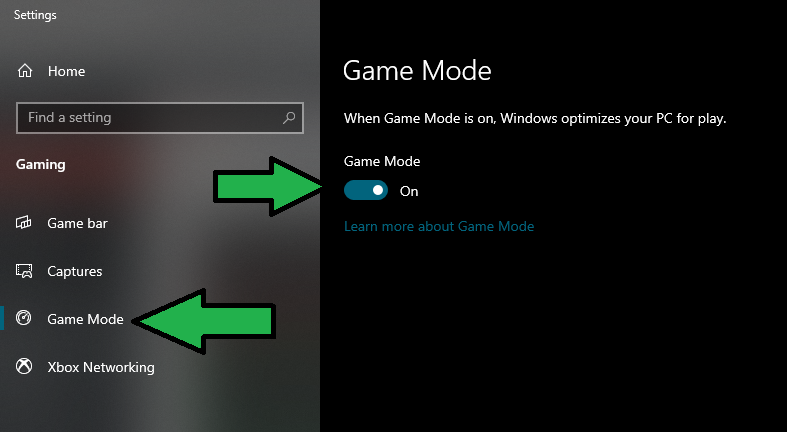
Game Mode In order to Enable Game Mode, simply head over to the same Xbox Game Bar Settings and turn this slider to the right.
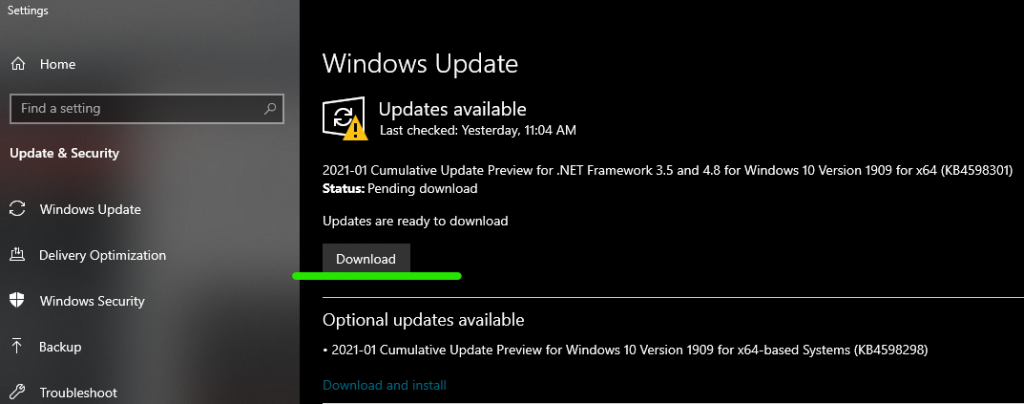
Update Windows 10 To The Latest Version
While lots of gamers struggle to find options that permanently disable Windows 10 Updates. We haven't really supported this idea, and while benchmarking tons of games here at exputer. We have always noticed similar performance improvements just like new Graphics Drivers through the latest Windows Updates. There are numerous reasons as to why this happens. Firstly, it's worth noting that Microsoft itself wants the game to run properly on Windows 10 because after all, they publish games on PC as well. Moreover, the new updates always bring stronger support for drivers, therefore, allowing Hardware to run better. All these factors result in tremendous FPS Boost, and this was the case while playing Rust.
- Click on Start Button > Search for Check For Updates
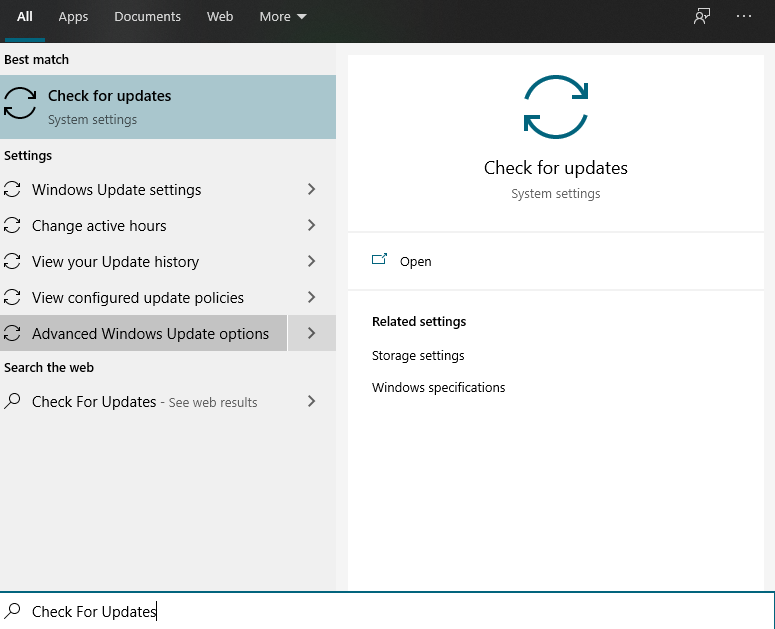
- Search for Updates, and as you can see In my case, new updates are available to download
So these were all the necessary Windows 10 Optimizations that you had to make. Obviously, there will be instant FPS Boost after all these configurations. However, we recommend to not jumping directly in Rust, instead, work on those that are suggested below too, and then make conclusions. This is afterall, a long process, and the core purpose of these Windows Optimization were to make sure that extra applications weren't burdening the hardware.
Now that you are done, let's dive right into the best in-game Rust Settings.
Best Launch Options For Rust
Launch Options play a vital role in improving our Best Rust Settings. Usually, lots of players debate over the use of launch options in Rust, as most suggest they do not work anymore and compatibility is a serious problem. We acknowledged this but still went above and beyond to test the game.
As per our benchmarks, only some launch options worked, and these are listed below.
- -window-mode exclusive – Rust has serious full-screen problems, that are further expanded by the weird hybrid mode in which the game mostly runs in borderless mode. This can be fixed through two options, the first is -window-mode exclusive, which will guarantee the full-screen option, and the second is -high which runs the application on priority.
- -high – This expands on window mode exclusive, and also provides an additional benefit by running Rust in high priority mode. This ultimately results in more FPS, as the PC focuses on deriving all resources to the game.
- -forcee-feature-level-11-0 – Many argue this isn't needed as, by default, Force feature level works fine. Nonetheless, it's better than anything, and insurance is always worthy.
- -malloc=system – The malloc system command line varies and would not benefit in all cases. In case you don't know about this class code, it simply enhances or configures what memory allocator is being used by the game.
- -maxMem=14000 – The MaxMem command has proven to be the most beneficial of all. We noticed that Rust wasn't utilizing all the Ram available, therefore, Assets wouldn't load faster and there were terrible frame drops. This was later fixed through the maxMem command that utilizes a certain value associated. You can check your Memory through the Task Manager, and utilize 20% for Windows, while the remaining for the game. In this picture, 14000 refers to 14 GB.
- -cpuCount=6 – Similar to maxMem, you can also change the cpuCount for the game. Once again, this can be checked through the Task Manager. In my case, I'm using the Ryzen 3600x, so the core count would be 6.

Task Manager - -exThreads=12 – The last enhancement would be through the exThreads amount. You can make sure that Rust is utilizing all the cores through this command line. We have 12 threads in our Ryzen 3600x, so the value would be 12.

exThreads amount - All in all, these command lines sum up to this. You can enter them in the Steam Launch Options.
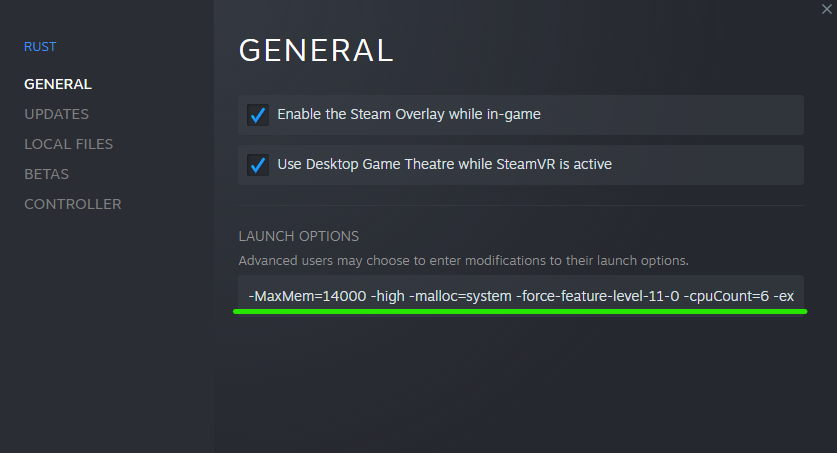
Steam Launch Options
-MaxMem=14000 -high -malloc=system -force-feature-level-11-0 -cpuCount=6 -exThreads=12 -window-mode exclusive
Nvidia Settings For Rust
Before we jump to the in-game Rust settings, it's highly imperative that we first setup Nvidia and AMD Control Panel for further optimization. These configurations will result in tremondous FPS Boost and Sync well with the in-game settings we have shown below. The goal while benchmarking Rust was to find the correct combination that would result in High FPS while still showing excellent visuals and fidelity.
Similar Best Settings FPS Guide: Best Valorant PC Settings For High FPS And Competitive Visuals (Updated 2021)
If you miss on these Nvidia Settings, you are likely to see a 20% performance loss, which translates into lots of FPS.
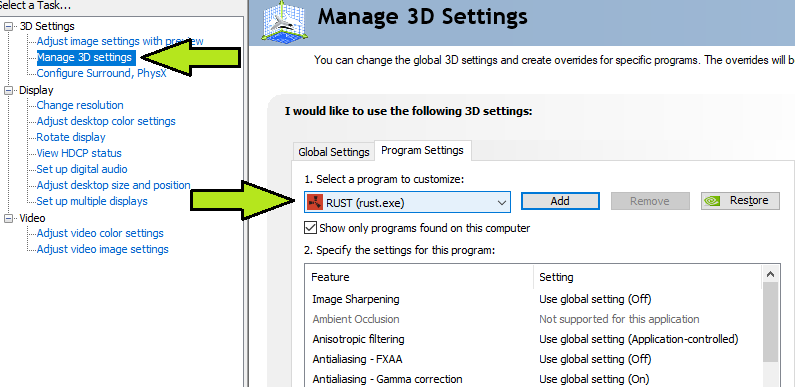
Nvidia Control Panel Open Nvidia Control Panel > Manage 3D Settings > Add Rust.exe
Afterward, make the following tweaks.
- Image Sharpening: Use Global Settings (Off)
- Anisotropic Filtering: 16x
- Antialiasing – FXAA: Use Global Settings (Off)
- Enable Antialiasing – Gamma Correction
- Ovverdie Any Application Setting under Antialiasing Mode
- Depending on your system, select either 4x or 8x under Antialiasing – Setting
- Use Global Setting (Off) Under Antialiasing – Transparency
- Once Again, Use Global Setting (Off) Under Background Application Max Frame Rate
- Select Your Primary Graphics Card Under CUDA – GPus
- Low Latency Mode: Use Global Settings (Off)
- Max Frame Rate: Although, many suggest turning it to max. But, we encountered many bugs while doing this.
- Multi-Frame Sampled AA (MFAA) – Off
- OpenGL Rendering GPU: Select Your Primary Graphics Card
- Checkmark "Prefer Maximum Performance" Under Power Management Mode
- Shader Cache: On
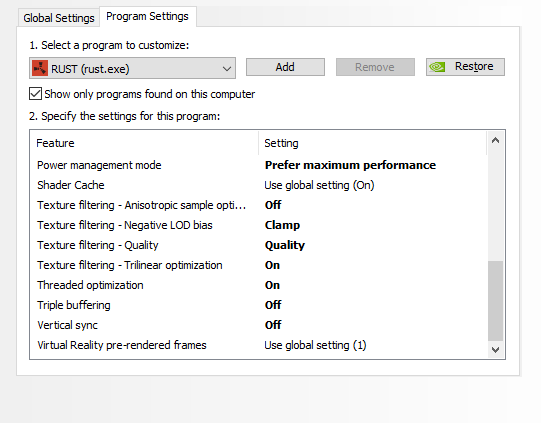
Rust Nvidia Settings - Texture Filtering – Anisotropic Sample Optimization – Off
- Select Clamp under Texture Filtering – Negative LOD bias
- Texture Filtering Quality – Quality
- Texture Filtering – Trilinear Optimization – On
- Threaded Optimization – OIn
- Triple Buffering – Off
- Vertical Sync – Off
- Virtual Reality pre-rendered frames – Use Global Setting
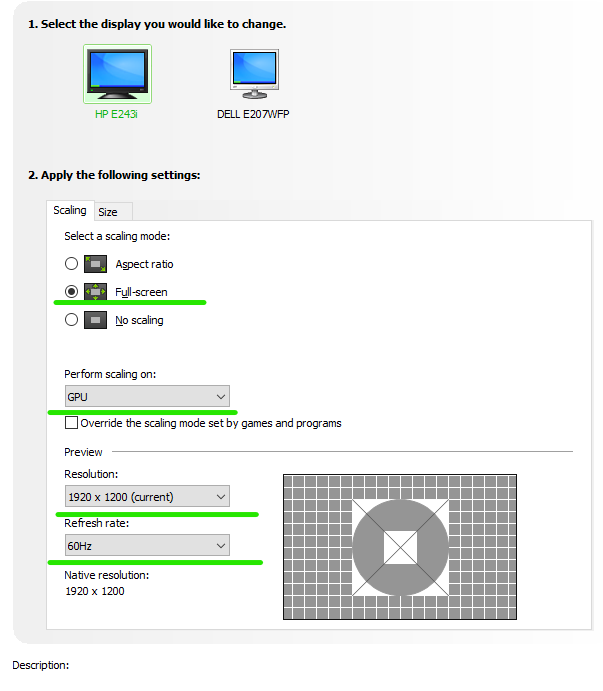
Don't forget to select the primary monitor while configuring these changes. After making changes, proceed to Adjust Desktop Size and Position. Under there, Select Full-Screen Under Scaling, and GPU in tab Perform Scaling Tab. Besides, also make sure that the Resolution entered is Native, and you are selecting the max refresh rate.

Nvidia In the Change Change Resolution Tab, Select your Native Resolution plus Refresh Rate. Also under the color settings, checkmark the Nvidia Color Settings, and proceed with the configurations shown below.
- Open View Advanced System Settings > Performance > Settings > Enable Custom and Only Checkmark the options shown below.
Nvidia Ansel Settings For Rust
Initially, you might be thinking why Nvidia? Do I need configurations for AMD FreeStyle? Well, we aren't able to provide accurate metrics for AMD. But that isn't hard, and all you have to do is see whatever settings fit your likings. Our Rust Setting Guide was layed out through Nvidia GeForce 1080 Ti, therefore, finding a good Reshade Combination was easy.
Make notes that this subject of the guide isn't mandatory, all it does is that it enhances the image quality without any performance compromisation. Rest assured, it's imperative to first enable Nvidia Game Mode and then find out how the configuration works.
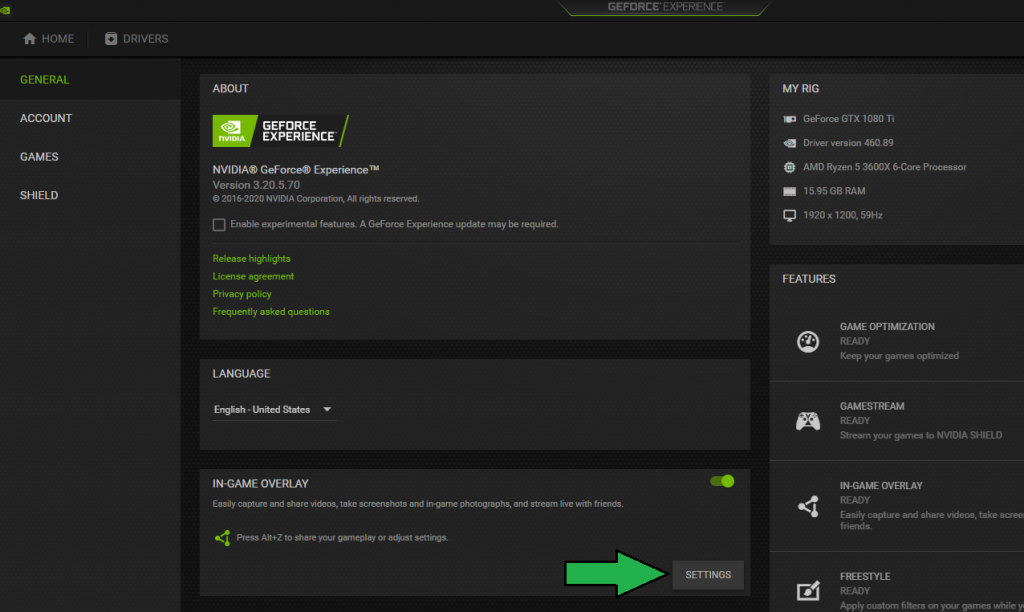
- Open GeForce Experience And Proceed To Settings
GeForce Experience - Now Click on In-Game Overlay Settings
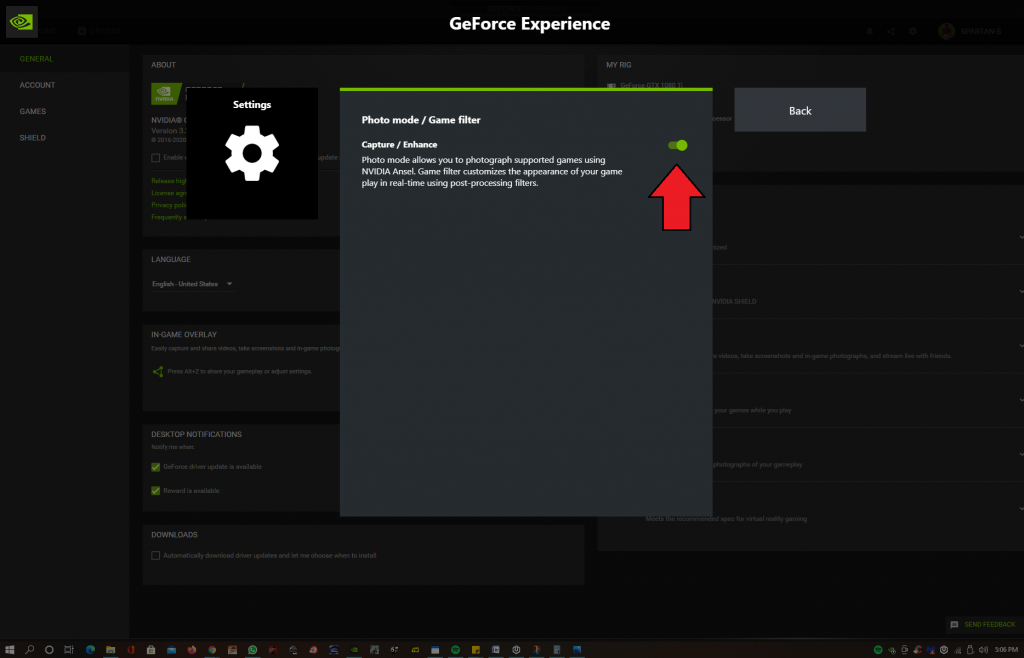
Overlay Settings - Proceed to Photo Mode / Game Filter from the menu and checkmark the Capture / Enhance Tab.
Game Filter - Launch Rust and Open the Nvidia Ansel Overlay By ALT + F9 on Keyboard, Add Details and Color Tab
- Now make the following changes under both sections
- Sharpen 18%
- Clarity 22%
- HDR Toning 70%
- Bloom 26%
- Tint Color 0%
- Tint Intensity 0%
- Temperature 0
- Vibrance 42
Having said that, Nvidia Ansel and AMD FreeStyle could do wonders for your Rust Image Quality. You might be wondering what are the differences? To illustrate, there is a notable difference in the Sharpness and Vibrance of Images, along with brightness collaboration across all graphical elements. This truly transcends the gameplay and takes it to a whole new level, both in terms of Graphics and Performance. Here are some screenshots, that are heavily de-compressed but still show the stunning difference between default and reshade.
Default Settings
Reshade:
Although, these photos are highly de-compressed and won't show you the results that we are trying to portray. We still recommend trying it out and seeing the difference for yourself.
The Best AMD Settings For Rust

Similar to the Nvidia Tweaks we have shared above. AMD users can also get access to their own Control Panel and arrange further enhancements. The difference in result between both GPU's isn't huge, and you are likely to get the same result. Besides, these configurations are mostly dependent on the in-game settings, therefore, make adequate changes so you can get the correct combination for High FPS and Best Rust Settings.
- Add Rust to the AMD Control Panel > Edit Profile
- Make the following changes.
- Graphics Profile: Custom – This will allow you to make custom changes.
- Radeon Anti-Lag: Disabled
- Radeon Chill: Disabled
- Radeon Image Sharpening: Disabled
- Radeon Enhanced Sync: Enabled
- Anti-Aliasing: Override Application Settings
- Anti-Aliasing LEvel: 8xEQ
- Anti-Aliasing Method: Supersampling
- Morphological Anti-Aliasing: Disabled
- Anisotropic Filtering: Enabled
- Anisotropic Filtering Level: 16x
- Texture Filtering Quality: Standard
- Surface Format Optimization: Enabled
- Tesselation Mode: AMD Optimized
- Triple Buffering: Disabled
- Radeon FreeSync: The Radeon FreeSync is a great feature, that does not make you realize the drop in frames due to the constant refresh-rate cap. However, most players debate over its input lag, and competitive players aren't big fan of it. We don't find Rust any insanely competitive like CS:GO, where every second matters. Thus, it's recommended to keep it enabled.
- Scaling Mode: Center
- Integer Scaling: Disable
- Custom Color: Disabled
Lastly, don't forget to update your drivers to the latest version.
Best Rust Settings
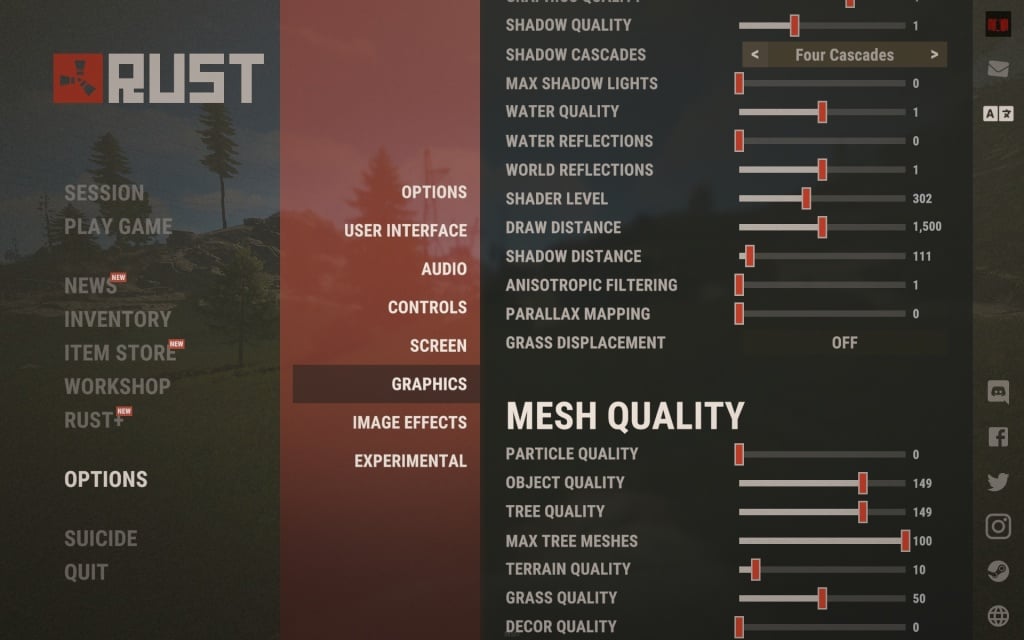
Hopefully, now that you have finally made all the configurations suggested above. It's time to dive into the final piece and optimize the in-game Best Rust settings which are the most crucial part of this guide. Our settings as always are focused on High FPS and Sharp Visuals, so the goal is to find the right balance. In addition, we also benchmarked the game several times and avoided focusing on settings that had huge performance impact, while showing little to no improvement in Graphical Sector. This also seems to be a pretty common problem in Rust, and you would also notice that the majority of settings including Max Shadows Lights, Water Reflections, and Parallax Mapping have zero to no effect on fidelity. Anyhow, here are the best rust settings for high fps and sharp visuals.
Screen Resolution: Select Native
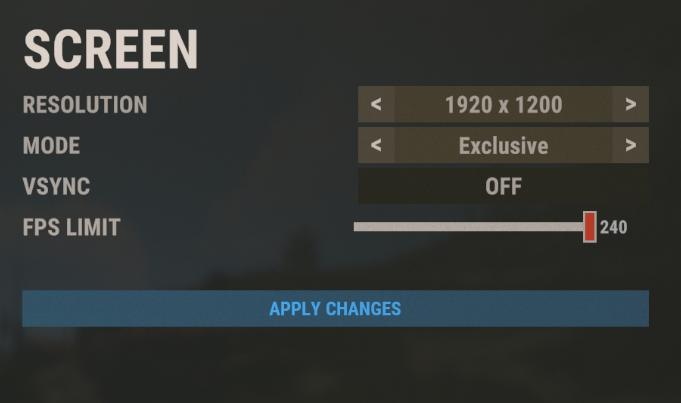
Mode: Exclusive
This is another word used for full-screen which is necessary for max refresh rate and high performance. Some people also prefer Borderless due to the quick Alt Tabbing, however, we noticed several crashes with that.
VSync: Off
Enabling this would ultimately mean that you are going to experience high input lag, and also cap your framerates to 60. This isn't helpful, especially if you are playing at High Refresh Rate Monitor, because the frames wouldn't reach the desired cap.
Graphical Quality: 4

The Graphical Quality setting maintains an overall meta for the entire preset in the game. During our benchmarks, we noticed heavy lagg on anything above 4, and while testing it on 1,2, and 3. We were griefly disappointed with the poor graphics. The main difference between higher Graphical Quality and lower is only related to the quality of shadows, which makes a huge difference especially in Rust because of the open maps.
Shadow Quality: 1

No Major difference in all other presets. One seems to be the most optimized setting.
Shadow Cascades: Four Cascades

Although in the majority of climates, you aren't going to see much of this setting, because of what it does. However, in bright light maps, there is immense difference due to the shadow quality. Moreover, there is also slight change in the dimensions of shadow, which does signify to the overall quality. If you go with lower Shadow Cascades quality, make notes, that the Shadow Distance quality will also be limited.
Max Shadow Lights: 0
Similar to Shadow Quality and Cascades. The Max Shadow Light also shows impressive results in the overall graphics. But that seems really limited, because unlike cascades and Shadow Quality, which play an essential role 24/7. The Max Shadow Lights only seems to have a purpose when there is a reflection from objects. Subsequently, If you look at the performance, this setting does seem to be a problem and to sum it up. It is not worth it.
Water Quality: 1

Another performance hogg was the Water Quality, which does seem like a big problem, but unfortunately it needs to be kept down. The essential difference between Water Quality 1-3 boils down to the texture, blurriness, and reflections. It isn't noticeable across all places and therefore, we must keep it at one.
Water Reflections: 0

It is imperative to keep water reflections at 0 due to two reasons. The first being that we have already kept Water Quality at one, which will play a significant role in setting the overall meta. And the second is due to performance problem, which is reasonably huge in water reflections.
World Reflections: 1
The Water Reflection setting maintains an astounding clarity and adds exception fidelity to the overall world of rust. Likewise, it also has its drawbacks but luckily at one, we were only able to find a roughly 2% performance loss which isn't a big deal, considering the massive improvements.
Anisotropic Filtering: 1
Subsequent to finishing our test bench, we were heavily bugged with how Anisotropic Filtering, because it provided very grainy graphics. Incase you don't know much, grainy graphics in the PC World refers to extremely sharp textures that can sometimes give you headache. In addition, the gripping textures also have a huge impact on performance and all in all, it's not worth it to be kept above 1.
Despite what is explained above, and If you still feel like the textures aren't sharp enough. We still don't recommend tuning up Anisotropic Filtering, and instead take benefit of Nvidia Ansel and AMD's FreeStyle, which is explained in the last section of this guide.
Parallax Mapping: 0
Keeping Parallax Mapping at Zero is the best thing you can do in Rust. That is to say, the impact on performance was roughly 30%, and on the dark side, it has zero to no benefits except showing slight illusions that are merely rare, depending on the weather.
Grass Displacement: Off
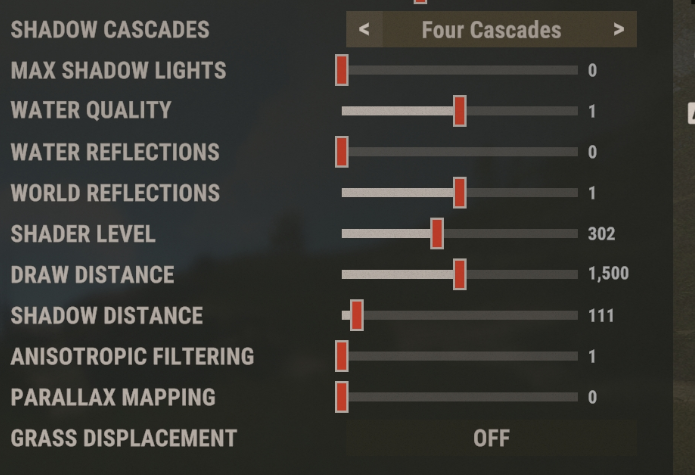
The Grass Displacement feature seems to be another unnecessary setting that impacts performance while having no meaningful purpose.
Particle Quality: 0
While showing little to no improvement across the Graphical Sector. It's reasonable to presume that Particle Quality Should be kept at 0. The difference in performance is vast, and unlike many other games, where Particle Quality sets the base framework for all graphics. It wasn't the case in Rust, and all we noticed was added elements that weren't always noticeable.
Object Quality: 150

Have you ever come across numerous objects that aren't rendered, and you are able to see through walls? Well, that is definitely due to Object Quality, which pre-renders all graphical elements to an extent depending on the quality. Similarly, the performance problem isn't that serious here, but the core purpose of this setting is important as it changes the overall experience. We recommend keeping it at 150 for best FPS and realistic fidelity.
More From Settings Guide: Best Call of Duty Black Ops Cold War PC Settings For High FPS
Tree Quality: 145
Simialr to Object Quality, the Tree Quality preset also focuses on rendering the bushes, trees, and more. This gets further expanded through the Tree Quality, and enhancing the overall object. If you keep it at 50-100, the Trees Look something out of 2D Game, and performance isn't also very noticeable. The best results come in at 150 with accurate greenery element and detailed graphics.
Max Tree Meshes: 100
Terrain Quality: 10
Although many Rust Players Across Steam, YouTube, and Forums conclude that apart from the quality itself, the Terrain Quality feature also improves the rendering distance, which isn't actually true. We couldn't find this feature, and apart from that. The Terrain Quality slider that goes up to 100 didn't marginally improve the graphics by a lot. The most optimized and best setting seems to be at 10, which gets further compensated by Anti-Aliasing.
Grass Quality: 50
The Grass Quality setting doesn't really require an explanation. All it does is changes the textures and quantity of all grass across Rust. This setting does have a reasonable impact on performance but at the same time. Its results are really noticeable, and as you would already know. The grass is all over the place in Rust. We found 50 to be very optimized, and also it resulted in a 4% FPS Drop, which is perfectly fine.
Decor Quality: 0
As the title sub-heading suggests, Decor Quality only works around extra-added decor elements, that include things like Flowers and numerous other leafs you wouldn't normally notice. Furthermore, the experienced Rust players would know that Decor Quality needs to be turned off, because once enabled, the Grass Density increases significantly, and it becomes harder to find items. We tested Decor Quality across numerous green belts, and weren't able to find any performance differnet. The takeaways are that If you are a competitive player, keep it enable, and likewise disable it If you are playing Rust Casually.
Anti-Aliasing: TSSAA
Under the Forest Portion of Image Effects Settings Tab, you will find numerous entries including the Anti-Aliasing, which is considered as the core feature of all graphics. We were really adamant about the setting and decided to go with TSSAA for two reasons. Firstly, the texture quality in TSAA was really smooth and it bent properly with the environment. Besides, looking at long-distances also didn't hurt the eyes, the textures weren't too noisy. This was also our main problem with SMAA and FXAA, where the textures became incredibly sharp and it started to hurt the eyes after a while. You can certainly go with SMAA which is also a decent choice, but remember, that sharpness can also be figured through Nvidia Ansel, which doesn't come with the consequence of performance.
Depth of Field: Off
Keep Depth of Field disabled, because it has added layers that increase the blurriness in long-distance objects. The game does look fabulous, but it's more of a cinematic feature and not good for gameplay.
Ambient Occlusion: Off
As many rust players complain about the graphics being too washed out. The Ambient Occlusion feature could be a decent fix, because not only does it provides added shadows, but it also improves their depth. The setting is handy in situations like these, but since we have already enabled Four Cascaded Shadows, you can turn it off to save performance.
High-Quality Bloom: Off
Enabling this would improve the brightness and lighting across rare places, and apart from that, this setting doesn't seem to have lots of value. We recommend keeping it disabled, and you will find more about this in the Nvidia Ansel section.
Lens Dirt: Enable
The Lens Dirt feature is subjective and can be both enabled or disabled, depending on the performance. We couldn't find a noticeable difference in performance, and that goes the same for the fidelity. According to Rust, this adds dirt effect in extremely bright places, which ultimately means a new layer that are similar to glass pane.
Motion Blur: Off
We have always recommended turning off Motion Blur, because it's an unnecessary feature that has a huge impact on performance.
Sun Shafts: Off
We tested Sun Shafts for a few hours and weren't able to find any noticeable difference. The only place where we found any noticeable difference was also in bright sunlight and rays seemed to have an extra-layer of features. Moreover, the impact on performance is also barely noticeable.
Sharpen: Off
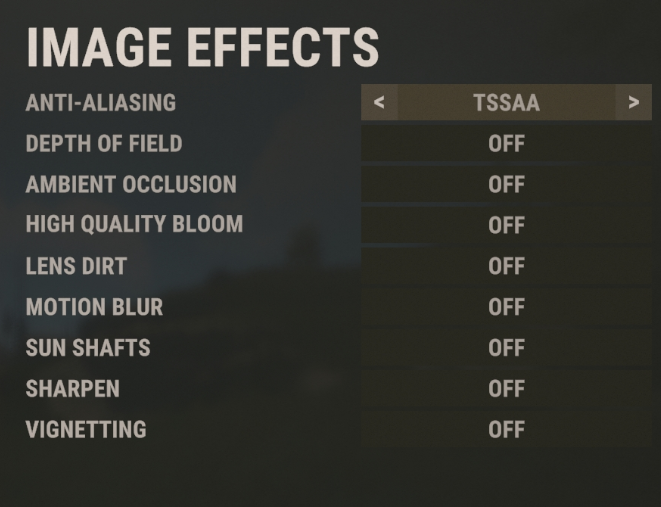
Initially, we enabled Sharpen for better texture quality. However, in the later phases of our testings, it was disabled due to two reasons. One, If Anti-Aliasing is disabled, there is no point in adding an extra depth of sharpness. Secondly, Sharpen seemed to have a notable impact on performance, and we achieved the exact same results with Nvidia Ansel, without compromising on performance.
Vignetting: Off
No noticeable difference in fidelity and performance
Occlusion Culling: Enabled
Under the Experimental Settings, Only Enable Occlusion Culling and disable the rest.
Field of View: 90
The Field of View, commonly known as FOV, changed the dynamics of camera, allowing you to show more pixels at a time with higher FOV. This setting usually accounts for 30% performance in numerous games. However, that was not the case in Rust. We only figured a roughly 8% FPS Loss on Max FOV and similarly, the diffrence in gameplay was very meaningful. Other than this, FOV also depends on your monitor size and your distance to the desk, so I'd say this setting is subjective.
Compass Visibility: On
It's literally impossible to play Rust without Compass Visiblity.
Streamer Mode: Off
Are you a streamer? If so, Enable this in Rust. Likewise, keep it disabled if you aren't.
Nudity: Uncensored
With Censored, there is roughly a 4% reduction in performance. Therefore, see If you would like to trade that for the change.
Rust Optimization Takeaways
We weren't really impressed with the quality of guides on the Best Rust settings out there, and therefore, it was really hard to find the purpose of all settings and explain it, so they were readable. Apart from that, It also seemed that the problem was with Rust too, because unlike Modern Games, which have Low to Ultra High Tweaks, Rust has sliders that are hard to figure out. Moreover, we were also frustrated over numerous settings that didn't show any difference and were performance hogg. This gets topped off by the poor interface of the game… that is to say, a lot of settings do not have descriptions, and their purpose remains anonymous.
Apart from Rust Settings, we have also configured numerous Windows 10 Optimizations that will be fruitful for you across all games. Besides, all these were safe, and as always, our guide has never forced users to download external software, which often leads to malware.
Let us know in the comments below If you have any suggestions or complaints.
How To Increase Fps In Rust
Source: https://exputer.com/guides/settings/best-rust-settings/
Posted by: wilsonnoweed.blogspot.com
0 Response to "How To Increase Fps In Rust"
Post a Comment